Doors
With v3.8, the logic of the Door class has been moved into a Door component, also now any actor can be used as door actor.
The Door class is deprecated and will be removed in a future version of the plugin.
This page has been updated to the latest changes.
Do a backup of your blueprints (or your whole project) before migrating your door actors (in case you're not using some versioning like git or svn).
The generator will instantiate some actors to place at door locations if you provide some actor class through its Choose Door function.
Only one actor is instantiated for a door shared between 2 rooms, so your 3D mesh must include both sides of the door.
An actor may also be instantiated for unconnected doors (a room door that does not lead to another room). Use that to your advantage by spawning a wall for example.
If you want to see the correct size depending on the door type in the blueprint viewport of the actor, you have to set the Type variable of the door.
See the following sections to use the built-in Door Component for a fully implemented door logic (so you only have to make your door visual), or to use the Door Interface if you want more custom logic.
Door Component
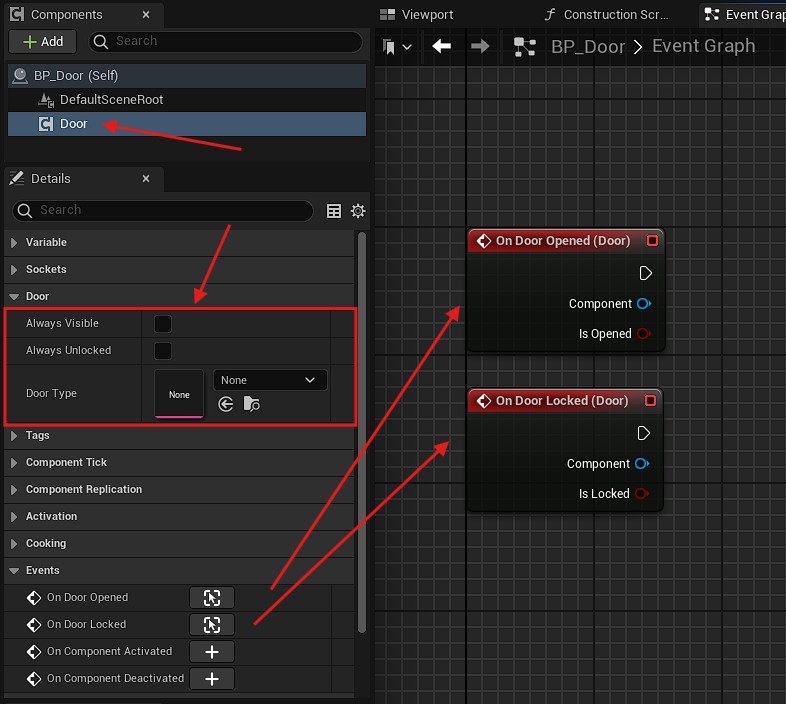
The easiest way is to add the Door Component to your actor.
You can then set its Door Type asset, have a visualization of its size, etc.
You should bind events from the Door Component to know when the door is opened/closed or locked/unlocked. This is particularly useful to update your door meshes and animations.
The legacy Door actor itself now implements the Door Component.
If you have updated the plugin from v3.7, some variables and events may be marked as deprecated.
Update your actors accordingly by using the same events and variables from its Door Component instead.
Door Interface
If you want to create your own door logic, the Door Interface is available to be implemented on either your door actors or components (the interface on the actor is prioritized over the one in the component).
The interface exposes to your actor or component those functions:
Get Door Type: let the plugin know which door type this door actor is. It is used to check if the type is matching when the actor is spawned.Set Room Connection: called when the actor is spawned. Store this object in a variable to have access to the connection variables in you door logic (Room A,Room B,Locked,Open, etc.).
Multiplayer
The open/close state of the doors are replicated over the network.
However, you'll need to do your game network logic correctly to make doors work properly in multiplayer.
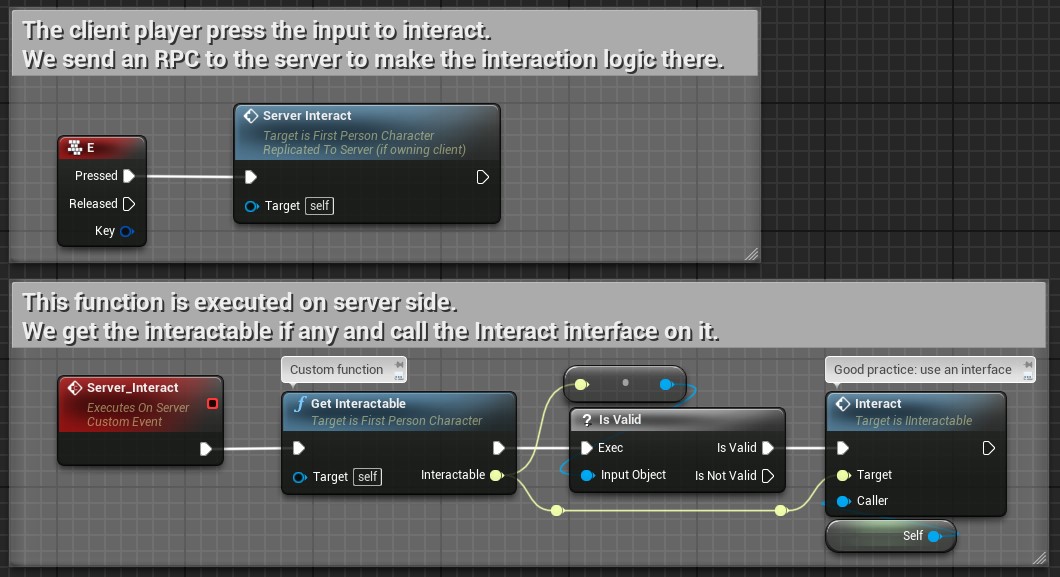
For example, if you want to make a door that open/close on a player key press, you'll need to send an RPC from your PlayerController or your controlled Pawn in order to call your interaction function on you door to open/close it.
(The screen below uses a generic interface to interact with any interactable actor. See the "Good Practice" section below on how to do it)
Good Practice
The screen above uses a custom interface called IInteractable to generalized the player interaction with whatever actor you want in the game.
This section is not specific to the Door class of this plugin, but I will explain briefly how to use an interface in Unreal blueprint for those who are not familiar with this concept.
First, you have to create the interface class and populate it with some functions. For the example, I called it IInteractable (the first I is a naming convention for interfaces) and I put two functions inside it:
CanInteractwhich takes anActor(namedCaller) in input if I need to check some things before interacting, and returns abool(true ifCalleris able to interact).Interactwhich takes also theCalleractor as input, and do the actual interaction on theIInteractableactor.
Remember that you can create any function with any inputs and outputs you want in the interface.
Then you have to add the new interface in your interactable actor settings (the door in my example).
Then, you implement the CanInteract and the Interact functions from the interface in your actor.